
Table Of Contents
- 1 What Is LED Recessed Lighting Retrofit?
- 2 Why Should You Consider Installing LED Recessed Lighting Retrofit?
- 3 What Tools And Materials Do You Need For The Installation?
- 4 Step-By-Step Guide To Installing LED Recessed Lighting Retrofit
- 5 Tips And Tricks For A Successful LED Recessed Lighting Retrofit Installation
- 6 How To Troubleshoot Common Problems With LED Recessed Lighting Retrofit?
- 7 Conclusion
Are you looking to upgrade your home lighting to be more energy-efficient and cost-effective? LED recessed lighting retrofit might be the perfect solution for you!
In this comprehensive guide, we will walk you through everything you need to know about LED recessed lighting retrofit, from the different types and sizes available to a step-by-step installation guide.
We will also provide you with tips and tricks for a successful installation, as well as troubleshooting common problems you may encounter. Let's get started!
What Is LED Recessed Lighting Retrofit?
LED Recessed Lighting Retrofit involves upgrading existing recessed lighting fixtures with energy-efficient LED lights. Retrofitting helps in saving energy, reducing maintenance costs, and improving lighting quality.
LED Recessed Lighting Retrofit is gaining popularity as a cost-effective and sustainable solution for enhancing lighting efficiency in homes and commercial spaces. With traditional lighting consuming more energy and needing frequent replacements, the transition to LED lights offers significant benefits.
The key advantage of LED lights lies in their energy efficiency and long lifespan, which can result in substantial energy savings and lower maintenance expenses over time. By upgrading to LED lights through retrofitting, property owners can enjoy brighter, more consistent lighting that enhances visibility and aesthetics.
Explore: How To Retrofit Fluorescent To LED
Why Should You Consider Installing LED Recessed Lighting Retrofit?
Considering LED Recessed Lighting Retrofit is essential for energy savings, improved lighting quality, and reduced maintenance costs. Hiring a professional electrician for interior lighting upgrades ensures safety and compliance.
LED recessed lighting retrofit offers numerous advantages beyond just energy efficiency. These modern lighting solutions not only consume less energy but also have a longer lifespan, reducing the need for frequent bulb changes. In addition, LED lights emit less heat, making them safer for use in various settings. The initial investment in LED retrofitting can lead to long-term cost savings due to their durability and low maintenance requirements. Professional installation is crucial to maximize the benefits of LED recessed lighting, ensuring precise placement and optimal performance.
What Tools And Materials Do You Need For The Installation?
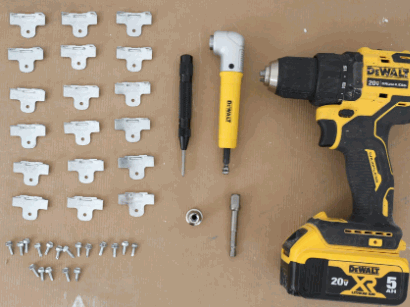
To install LED Recessed Lighting Retrofit, you will need tools like a center punch, sheet metal screws, a right-angle drill adaptor, and materials such as LED downlights, housing clips, and brackets.
Once you have gathered all the necessary tools and materials, the first step in the installation process is to turn off the power to the existing light fixture at the breaker panel to ensure safety.
- Next, use the center punch to mark the areas on the ceiling where the lights will be installed. This will guide you when making holes for the LED downlights.
- Then, with the help of the right-angle drill adaptor, create holes in the ceiling for the lights and secure the housing clips in place to hold the LED fixtures.
- Attach the brackets to the housing clips and carefully install the LED downlights, ensuring a snug fit for proper illumination.
What Are The Different Types Of LED Recessed Lighting Retrofit?
LED Recessed Lighting Retrofit comes in various types, including LED downlights, adjustable fixtures, and smart Wi-Fi-controlled lights like Philips Color LED downlights.
LED downlights offer a sleek and modern lighting solution, providing energy-efficient illumination for both residential and commercial spaces. They are versatile and can be recessed into the ceiling, creating a seamless look.
Adjustable fixtures allow for customized lighting angles, making them ideal for highlighting artwork, sculptures, or specific architectural features. These fixtures provide flexibility in directing light exactly where it's needed.
Smart Wi-Fi-controlled lights bring convenience and control to your fingertips, allowing you to adjust brightness, and color temperature, and even create schedules using a smartphone app. Syncing these lights with your home automation system can further enhance the ambiance.
What Are The Different Sizes Of LED Recessed Lighting Retrofit?
LED Recessed Lighting Retrofit is available in various sizes to fit different housing configurations, from small retrofit downlights for office spaces to larger fixtures for workshop areas.
For smaller interior spaces like offices or corridors, you can opt for compact options such as 4-inch or 6-inch retrofit downlights that provide efficient illumination without overpowering the area.
On the other hand, if you have larger areas like workshops or conferencing rooms to light up, consider the bigger sizes ranging from 8-inch to 12-inch fixtures for adequate brightness coverage. These larger fixtures are designed to deliver powerful lighting suitable for spaces that require higher levels of visibility and functionality.
Step-By-Step Guide To Installing LED Recessed Lighting Retrofit
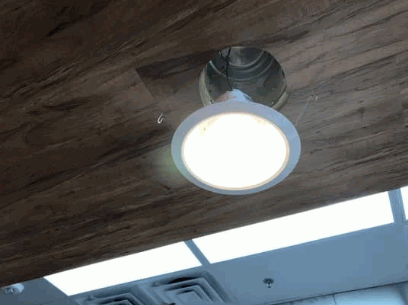
Installing LED Recessed Lighting Retrofit involves a systematic process, starting with turning off the power, removing the old fixture, preparing the junction box, connecting wires, securing the LED retrofit light, and installing the trim.
Before you begin the installation process, it is vital to ensure the power supply is turned off completely to prevent any electrical mishaps. Use a voltage tester to double-check that no electricity is flowing to the area you'll be working on. Once you've confirmed the power is off, carefully detach the existing fixture from the ceiling, making sure not to damage the wiring.
After removing the old fixture, inspect the junction box to ensure it's in good condition and compatible with the LED retrofit model you're installing. If necessary, make any adjustments or upgrades to the junction box before proceeding further.
The next step involves meticulously connecting the corresponding wires from the retrofit light to the electrical wiring in the junction box. Follow the manufacturer's instructions carefully to ensure the correct wiring connections, and use wire nuts to secure the connections safely.
Step 1: Turn Off The Power
Before beginning the installation process, ensure to turn off the power to the existing lighting fixture to prevent any electrical hazards. Use appropriate safety gear like safety glasses when working with electrical connections.
Disconnecting the power source is crucial to avoid the risk of electric shock or other accidents during installation. By shutting off the power, you create a safe working environment, reducing the chances of injury. It's a simple yet essential step that should not be overlooked.
When dealing with electrical components, always follow safety precautions to protect yourself. Safety glasses are a must to shield your eyes from any sparks or debris that may occur. They provide an extra layer of protection, ensuring your safety while working with electricity.
An electrician is trained to handle electrical systems safely and efficiently. Their expertise is invaluable in ensuring that electrical work is done correctly and safely. If you're unsure about any aspect of the installation, it's always best to consult a professional electrician for guidance.
Step 2: Remove The Old Fixture
Carefully remove the old recessed lighting fixture using appropriate tools, ensuring that it does not damage the surrounding drywall. Consult with an electrician for disconnection if needed.
When beginning the process of removing the fixture, start by turning off the power source to the lighting circuit to avoid any electrical hazards. Next, use a screwdriver to carefully unscrew the screws that hold the fixture in place. Once the fixture is detached, gently pull it down. Be cautious to not put too much pressure on the drywall to prevent any cracks or damage.
Common tools needed for this task include a screwdriver, wire strippers, and a voltage tester to ensure the power is off. It's crucial to follow safety protocols throughout the removal process to prevent any accidents or injuries.
For those who are uncertain or uncomfortable handling electrical components, it's highly advised to seek professional guidance from an electrician. They can ensure the disconnection is done correctly and safely, minimizing risks of damage or injury.
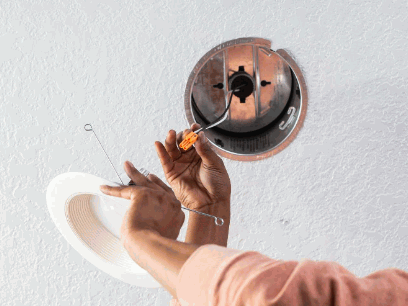
Step 3: Prepare The Junction Box
Prepare the junction box for the new LED Recessed Lighting Retrofit, ensuring proper alignment and stability using brackets. Secure the housing clips for a firm installation.
Properly preparing the junction box is crucial as it sets the foundation for a successful installation of the new LED lights. By utilizing brackets, you not only ensure correct alignment but also enhance the overall stability of the setup. Securely fastening the housing clips provides an extra layer of support, reducing the risk of any potential dislodging or movement of the lights post-installation.
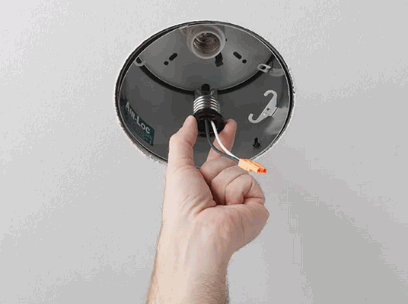
Step 4: Connect The Wires
Connect the wires of the LED Recessed Lighting Retrofit following the manufacturer's instructions. Use a socket adaptor for easy connectivity and ensure proper insulation of wires.
When establishing the connection for the LED Retrofit Light, it is crucial to pay close attention to the color codes specified by the manufacturer. Typically, the wires are color-coded with black for hot, white for neutral, and green or bare copper for ground. An electrician's expertise is invaluable in ensuring correct wiring, as they possess the necessary knowledge to safely and effectively handle electrical connections.
The socket adaptor plays a pivotal role in facilitating a hassle-free installation process. This adaptor allows for a seamless transition from the existing socket to accommodate the LED retrofit light, eliminating the need for complex rewiring tasks. By employing the socket adaptor, the retrofitting process becomes much more straightforward and cost-effective.
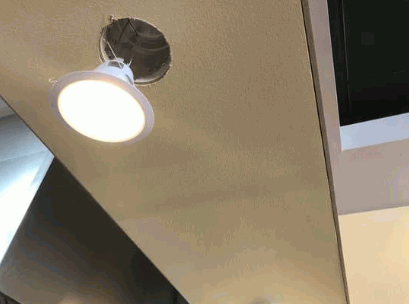
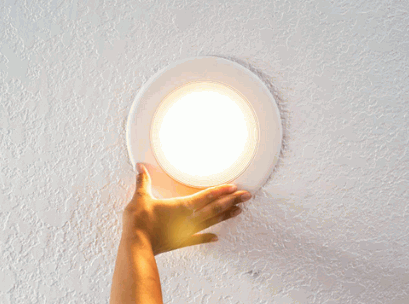
Step 5: Secure The LED Retrofit Light
Secure the LED Retrofit Light in the housing using sheet metal screws and mark the position for accurate alignment with a sharpie. Ensure a snug fit for proper functioning.
Securing the LED Retrofit Light is crucial for ensuring optimal lighting performance. Take your time to align the light properly within the housing, as this is key to achieving the desired illumination. Using sheet metal screws provides a secure attachment that will keep the light in place for an extended period. By marking the position with a sharpie, you can easily reference the correct placement, making the installation process more efficient.
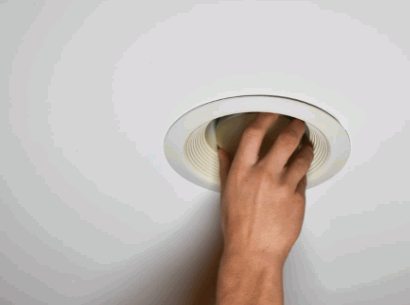
Step 6: Install The Trim
Install the trim for the LED Recessed Lighting Retrofit, using a sharpie to mark the trim outline and sandpaper for finishing touches. Ensure the trim enhances the aesthetics of the lighting fixture.
When installing the trim for your LED Recessed Lighting Retrofit, precision is key. Begin by carefully marking the trim outline with a sharpie, making sure the measurements are accurate.
Once the trim is in place, the finishing touches are crucial for a polished look. Utilizing sandpaper to smooth out any rough edges or imperfections will elevate the overall appearance of the fixture. Remember, the trim not only serves a functional purpose but also plays a significant role in enhancing the aesthetic appeal of your lighting setup.
Tips And Tricks For A Successful LED Recessed Lighting Retrofit Installation
To ensure a successful LED Recessed Lighting Retrofit installation, follow these tips: Watch a video tutorial for visual guidance, use the right-angle drill adaptor for tight spaces, and wear safety gear like safety glasses and dust mask.
Before starting the installation, make sure to turn off the power to the area where you will be working to prevent any electrical accidents. It's also advisable to mark the locations for the new LED lights accurately to ensure a symmetrical layout.
Consider investing in a stud finder to locate the ceiling joists easily, which will help in securing the retrofit lights more effectively. Using a cutting template can assist in making precise cuts for installing the LED fixtures without damaging the ceiling material.
How To Troubleshoot Common Problems With LED Recessed Lighting Retrofit?
Encountering issues like light flickering, light not turning on, or insufficient brightness with LED Recessed Lighting Retrofit? Consult an electrician for professional troubleshooting guidance specific to LED downlights.
In terms of LED retrofit light installation, various common problems can arise that may require specialized knowledge to address. From compatibility issues with existing wiring to discrepancies in voltage requirements, troubleshooting these technical issues can be complex and time-consuming.
While DIY solutions may seem tempting, seeking the expertise of an electrician is crucial in resolving these issues efficiently and safely. An experienced electrician can accurately diagnose the problem and provide tailored solutions to ensure optimal performance and longevity of your LED downlights.
Light Flickering
If you encounter light flickering after the LED Recessed Lighting Retrofit, it could indicate wiring issues or incompatible dimmer switches. Contact an electrician to assess and rectify the problem for optimal lighting performance.
Dimmer switches are designed to work with specific types of lighting, and using incompatible ones can cause compatibility issues leading to flickering lights.
Wiring problems, such as loose connections or improper installations, can also result in flickering lights post-LED retrofit.
An experienced electrician will be able to diagnose the root cause of the flickering and implement the necessary fixes to ensure your lighting operates smoothly.
Light Not Turning On
If your LED Recessed Lighting does not turn on, check the power supply, wiring connections, and bulb compatibility. Seek assistance from an electrician to diagnose and fix the issue effectively.
LED lights not turning on can be due to various reasons. One common cause is a faulty power source, so ensure the outlet is working properly and the switch is on. Faulty wiring connections can hinder the electrical flow, leading to non-functioning lights. It's crucial to inspect the wiring for any damages or loose connections. Moreover, LED lights may not turn on if the bulbs are incompatible with the fixture. Using the wrong type of bulb can result in a mismatch, causing the lights to remain off. If troubleshooting these aspects doesn't solve the problem, it's advisable to reach out to a professional electrician. Electricians have the expertise to identify and resolve underlying electrical issues efficiently, ensuring your LED lights illuminate your space as intended.
Light Not Bright Enough
If you find your LED Recessed Lighting Retrofit not bright enough, consider factors like wattage, bulb quality, or dimmer settings. Engage an electrician for proper assessment and adjustment to achieve desired brightness levels.
In terms of LED lighting, the wattage of the bulbs installed plays a crucial role in determining the brightness output. Opting for higher-wattage bulbs can significantly enhance the illumination in your space. Similarly, the quality of the bulbs used can impact the overall brightness and longevity of the lighting. Investing in high-quality LED bulbs can make a noticeable difference in the luminosity of the fixtures.
Improper dimmer settings may also contribute to dim lighting. Ensuring that the dimmer is compatible with LED bulbs and properly adjusted can help maximize brightness. Consulting with a qualified electrician is key in identifying the root cause of insufficient brightness and making the necessary adjustments to achieve optimal lighting output.
Conclusion
Installing LED Recessed Lighting Retrofit transforms interior spaces with energy-efficient lighting solutions. Following a detailed installation tutorial and using quality LED lights ensures a successful retrofitting project.
LED Recessed Lighting Retrofit offers a plethora of benefits beyond just illumination. These fixtures provide a modern and sleek look to the room, creating a visually appealing environment. The energy-efficient nature of LED lights not only reduces utility costs but also contributes to a greener footprint by decreasing energy consumption.
Proper installation procedures are crucial to maximize the functionality of LED lights. It ensures even distribution of light, avoiding shadowed areas and enhancing the overall ambiance of the space. By following a step-by-step tutorial, individuals can confidently undertake the retrofit process, resulting in a seamlessly integrated lighting system.
